Disclaimer
The writer of this article cannot be held responsible for for any form of damages that may result from the use of the information in this article. By reading this article, the user is effectively in agreement that the writer is completely exempt from any liability. If you do not agree, then do not read this article!

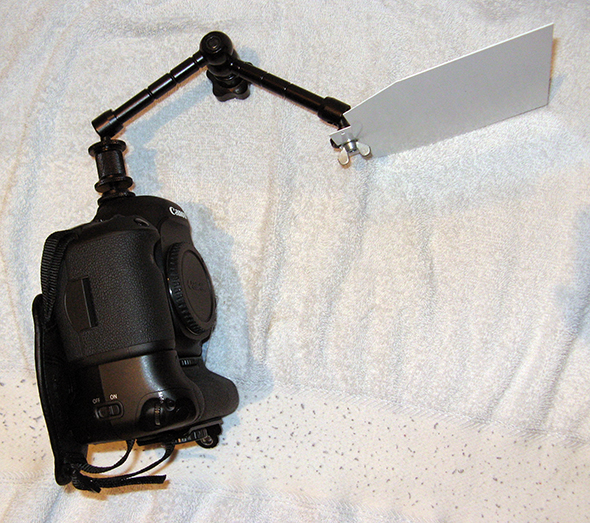
Here is a very simple and cheap way to build an adjustable lens shade for your DSLR camera. This is great for photography or video where;
- you do not want to use multiple lens hoods for different lenses,
- have difficulties attaching a lens hood because of a filter or lens attachment,
- you do not want to use a matte box or cannot afford one.
I have seen other adjustable lens shades that use a flexible arm but in the past I have found flexible arms to start loosening over time and struggle to stay fixed at certain bent positions. I also found that they tend to flex or move position when light to medium swing is applied.
This DIY adjustable lens shade uses an 11 inch magic arm which provides a very sturdy hold on the metal shade once tightened. It also allows you to use a magic arm clamp so that you can attach it to a base plate and 15mm rod system or anywhere else suitable if the length of the magic arm is too short when you attach it to the flash mount of your camera. So if you have a long telephoto lens and the shade does not extend long enough to reach the end of the lens, you could clamp the lens shade near the end of your base plate and 15mm rod system so that it is closer to the end of your lens and get it into position from there.

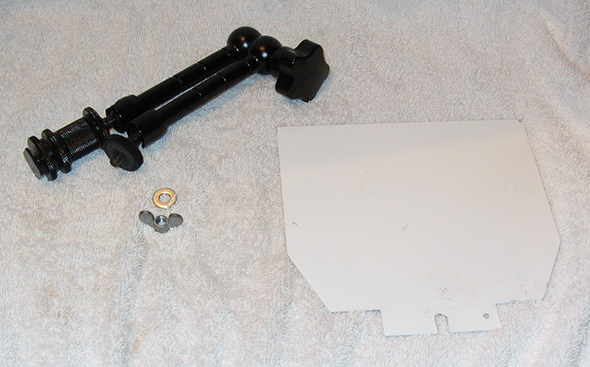
The parts used are;
- 11 inch magic arm with flash shoe mount attachment and clamp (optional),
- 1/4 thread wing nut and washer,
- D.I.Y. barn door or metal flash reflector part.
The 11 inch magic arm, flash shoe mount and clamp can be found on ebay for about $21-30 AUD at the time of writing this article. Simply do an Ebay search for ’11 magic arm’ and it should give you a good list of what items are available. Make sure to check what items are included to ensure you buy what you need for this DIY. The 1/4 thread wing nut and washer can be purchased from your local hardware store and the actual shade itself can be DIY built using sheet metal of some form. If I didn’t have my old metal flash reflector, I would have considered making one from biscuit tin cases, drilled a hole to attach the magic arm to and painted it black. I would strongly recommend rounding off the corners and filing down the edges or create a few millimeter bent lip inwards so that it makes a soft edge and doesn’t cut you when you are using it.
It is best to use a metal shade that is sturdy and does not flex or flap because it may flex or bend if wind catches it. You would also want something sturdy so that it can also protect your front lens from possible bumps or hits with other objects. I have now painted my shade satin black instead of the white you see in the picture, so that it minimizes light reflecting into the lens.
Overall this is a very sturdy adjustable lens shade that is affordable, easy to build and works to control lens flare. Adjusting the shade into position takes a bit of getting use to at the start, but once you know how it works so that it pivots where you want it to go then it is a simple matter of positioning and twisting the knob to lock the shade into position.


Feedback
*To embed code in Feedback, insert code between "pre" tags.